How to use Start-HistoricalSearch in Powershell

Managing and monitoring these communications effectively can be challenging, especially when it comes to compliance, auditing, and incident response.
Microsoft Exchange Online provides powerful tools to help administrators handle these challenges. One of these tools is the Start-HistoricalSearch cmdlet, which allows you to access your organization's historical email archives.
In this blog post, we'll explore how to use the Start-HistoricalSearch cmdlet to its fullest potential. Read on to learn more.
What is the Start-HistoricalSearch Cmdlet in PowerShell?
Start-HistoricalSearch is a PowerShell cmdlet available in Exchange Online and Exchange Online Protection that allows administrators to initiate a historical search for message trace and report details within specified parameters.
With this command, administrators can filter searches by various criteria such as message direction, sender address, recipient address, delivery status, and more, making it an essential tool for compliance and legal discovery purposes in cloud-based Exchange environments.
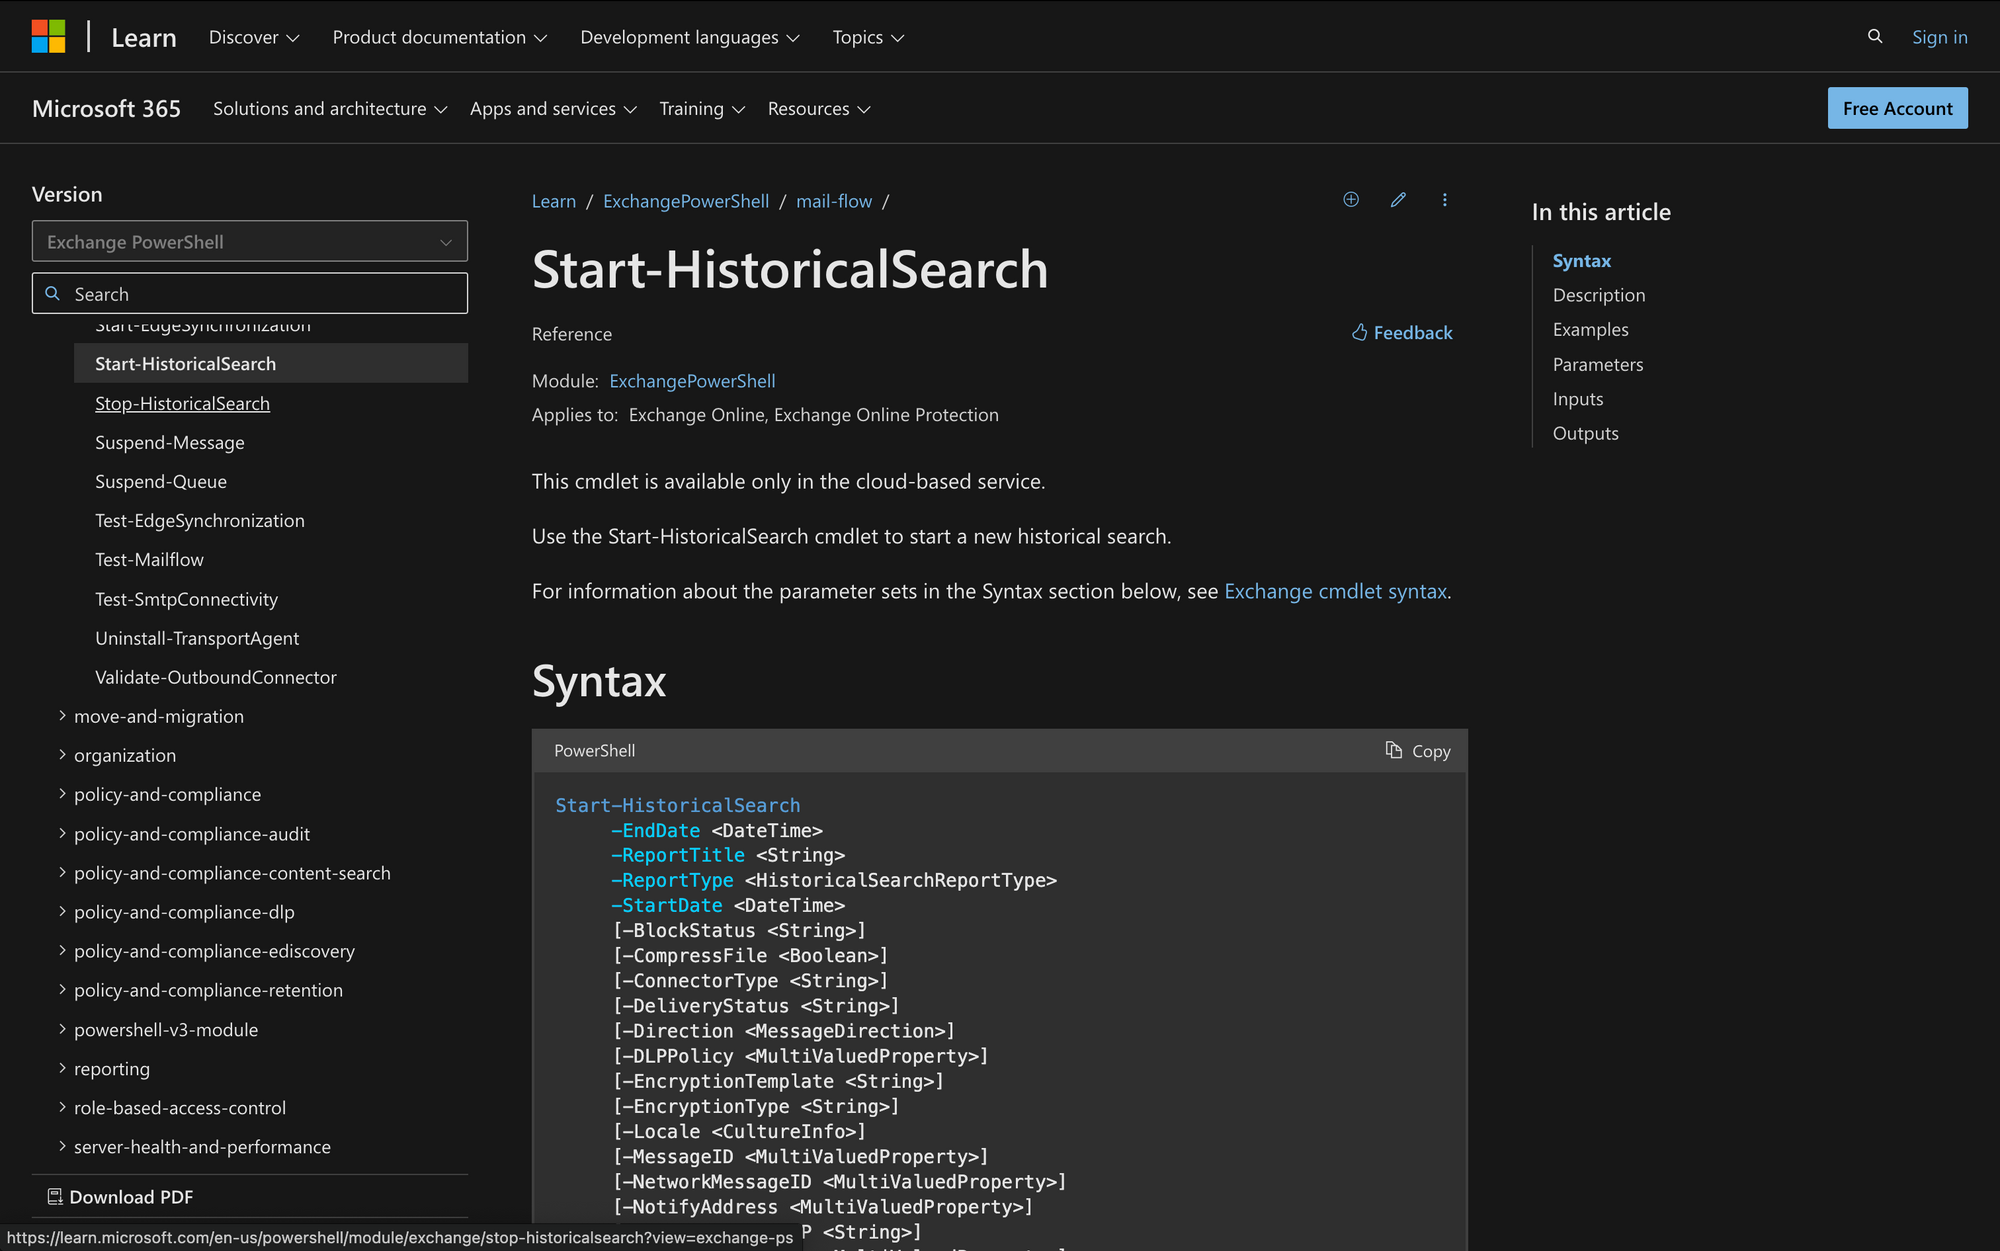
This is the syntax of the Start-HistoricalSearch command, and below, you’ll find a quick explanation for each one of these parameters:
- EndDate (DateTime): Specifies the end date and time of the historical search.
- ReportTitle (String): Sets the title of the historical search report.
- ReportType (HistoricalSearchReportType): Specifies the type of historical search report.
- StartDate (DateTime): Specifies the start date and time of the historical search.
- BlockStatus (String): Filters results based on the block status of messages.
- CompressFile (Boolean): Specifies whether to compress the CSV file output.
- ConnectorType (String): Filters results based on the connector type.
- DeliveryStatus (String): Filters results based on the delivery status of messages.
- Direction (MessageDirection): Specifies the direction of messages (inbound or outbound).
- DLPPolicy (MultiValuedProperty): Filters results based on Data Loss Prevention (DLP) policies.
- EncryptionTemplate (String): Filters results based on the encryption template used.
- EncryptionType (String): Filters results based on the encryption type.
- Locale (CultureInfo): Specifies the locale for the historical search.
- MessageID (MultiValuedProperty): Filters results based on the message ID.
- NetworkMessageID (MultiValuedProperty): Filters results based on the network message ID.
- NotifyAddress (MultiValuedProperty): Specifies email addresses to notify about the search results.
- OriginalClientIP (String): Filters results based on the original client IP address.
- RecipientAddress (MultiValuedProperty): Filters results based on the recipient email address.
- SenderAddress (MultiValuedProperty): Filters results based on the sender email address.
- SmtpSecurityError (String): Filters results based on SMTP security errors.
- TLSUsed (String): Filters results based on whether TLS was used.
- TransportRule (MultiValuedProperty): Filters results based on specified transport rules.
- Url (String): Filters results based on URLs in messages.
What Can You Use Start-HistoricalSearch For?
You can use the Start-HistoricalSearch command for various purposes (besides its main purpose). Here are some use cases:
- Message Tracing and Tracking: Administrators use Start-HistoricalSearch to trace and track email messages sent or received within a specified time frame. This is useful for investigating delivery issues, ensuring messages reach their intended recipients, and identifying any bottlenecks in email delivery.
- Security Incident Investigation: In the event of a security incident, administrators can use Start-HistoricalSearch to search for emails related to the incident. They can filter based on parameters like sender, recipient, and message content to identify potential threats, compromised accounts, or unauthorized activities.
- Compliance and Auditing: Organizations use Start-HistoricalSearch to comply with legal and regulatory requirements by searching for and exporting historical email data.
Prerequisites to Use Start-HistoricalSearch in PowerShell
Before using this command, make sure to comply with these three prerequisites:
- Permissions: Permissions: First, you need to have the necessary permissions assigned. These permissions are assigned through Exchange Online roles such as Compliance Management, Security Administrator, or similar roles that include eDiscovery permissions. Ensure that your account has the required permissions to conduct historical searches and access the data.
- Daily Quota Limit: There is a limit of 250 historical searches that you can submit in a 24-hour period. It's important to monitor your usage and be aware of this quota. If you reach or exceed this limit, you won't be able to initiate additional searches until the quota resets. Canceled searches also count against this daily quota, so it's essential to manage and prioritize your searches accordingly.
- Message Age and CSV Results Limit: The Start-HistoricalSearch cmdlet provides message trace and report details for messages aged between 1-4 hours and up to 90 days old. Additionally, each CSV file resulting from the search is limited to 100,000 results or lines. When initiating a search, consider the message age and ensure that your search criteria fall within the supported time frame. Also, be mindful of the CSV result limits to avoid incomplete or truncated reports.
How to Use Start-HistoricalSearch in PowerShell
Now that you know what Start-HistoricalSearch is for, let's learn how to use it in three easy steps.
Step 1: Open Exchange Online PowerShell
Open PowerShell on your local computer. Then, connect to Exchange Online using your administrator credentials. Use the Connect-ExchangeOnline cmdlet to establish a connection to Exchange Online, allowing you to run PowerShell cmdlets against your Exchange environment.
Step 2: Run the Start-HistoricalSearch Command
Once connected, initiate a historical search using the Start-HistoricalSearch cmdlet. Customize the command based on your search criteria. For example, to start a historical search named "Meeting Room Search" with a date range from January 1, 2024, to January 15, 2024, and specify a report type of Message Trace, use the following command:
This command initiates a historical search for message trace data from January 1, 2024, to January 15, 2024, for emails sent by james@meetingroom365.com and notifies simon@meetingroom365.com of the results.
Step 3: Monitor the Search Progress
After running the command, monitor the progress of your historical search. Depending on the size of your environment and the scope of your search, it may take some time to complete. Check the status of your search by running the Get-HistoricalSearch cmdlet like this:
This command provides information about the status and progress of your search, including whether it's still running or has completed.
Learning How to Master Start-Historical Search in PowerShell
The Start-HistoricalSearch cmdlet in Exchange Online helps administrators manage and investigate email communications effectively. It ensures organizations comply with rules, respond quickly to security issues, and understand email trends.
Because businesses rely heavily on email, understanding tools like Start-HistoricalSearch is crucial. By proactively using Exchange Online, you can protect data, streamline operations, and maintain trust with stakeholders.Reason for correction: Improved readability and conciseness.